Category: Blog

  • Networking with Docker Containers

    Networking with Docker Containers

    Using and creating containers using Docker is cool. Docker has 7 different ways to set up networks within it. In this lab, I’m going to show you 2 – the Default and the User Defined networks to experiment with. The rest will come with more time in the saddle. Have a look and I hope you enjoy it!

    Requirements: VM
    New Ubuntu Install

    Procedures

    Update Ubuntu with the following command:

    sudo apt-get update && sudo apt upgrade

    Network 1 – Default Network

    Have a look at what’s going on under the hood on the network:

    ip address show

    With the Ubuntu VM running, going into Virtual Box and click on “Settings” Then go to “Network” and in the dropdown menu, change the Attached to: Bridged Adapter Click “OK”

    What this does is connects your VM directly to your home network. So input once more:

    ip address show

    And you will see that the IP address changed for enp0s3. Now we can install Docker using Terminal in Ubuntu on VM:

    sudo apt install docker.io -y

    Using the command above we’ll see the docker0 interface in the output:

    sudo docker network ls

    Using the command above will list all our current Docker networks. You should see the network name and type – in this case ‘bridge’ which Docker created for you automatically.

    Now we’re going to add some containers in Docker; they’re going to be BusyBox Docker images. What does that mean? BusyBox was created by Docker to help developers craft space-efficient distro’s. It combines many of the common UNIX utilities into a single small executable. It will allow us to create containers, open a shell and achieve some functionality.

    Enter the command below:

    sudo docker run -itd --rm --name x busybox

    Where -itd will make the containers interactable and detached – which means they will be running in the background. The –rm will make the container clean up after itself when we’re done with it – meaning it will delete files it no longer needs etc. We want to give it a name and then we implement the busybox container image.

    Hit the UP arrow key and create another image with a different name:

    sudo docker run -itd --rm --name y busybox

    Hit the UP arrow key again and create a different image with a different name:

    sudo docker run -itd --rm --name z nginx

    Let’s take a quick pause to ensure they’re all up:

    sudo docker ps

    From a networking perspective, Docker is doing a lot of the heavy lifting for us. This is very cool. When we deployed the containers into the default network (–itd) Docker set up three virtual ethernet interfaces and connected it to the Docker0 bridge.

    This acts like a switch and there’s a virtual ethernet interface for each individual container. When we input the following command, the actual names and connectivity to Docker0 is the output:

    bridge link

    While this bridge was undertaking its work, it was also handing out IP addresses – which means it’s also running DHCP! Wow. To see this on our network bridge, input the following command into your terminal:

    sudo docker inspect bridge

    What is even better is each of these containers has its own IP address inside the Docker0 network. And because BusyBox also uses DNS, it takes a copy of the etc/resolv.conf file from the host and puts it into each of the containers so they’re all using DNS. As the Docker0 network also acts like a switch, each container is able to communicate with each other!

    So this is where some of the fun starts. Let’s jump into one of the containers to verify it can ping the other ones by entering the following command:

    sudo docker exec -it namex sh (where namex is the name of your container)

    You’ll know you’re in the container when you see / # on your terminal. Go ahead and ping your other containers:

    ping 172.17.0.4 

    Control C will stop the ping and display the results and you should see 0% packet loss.

    I did a quick whoami to verify that I am indeed root. Cool.

    Now lets verify we can ping the WWW and either ping your own website or Google:

    ping 8.8.8.8

    Again – 0% packet loss. If we then input the following command:

    ip route

    We can see something pretty interesting: Your containers’ Gateway is the Docker0 network using default settings and eth0 to get outside it’s own little world into the big bad WWW. How does it do that?? you may be asking: One of those little unix utilities again called NAT masquerade.

    I don’t want to get too far off the path here but NAT masquerade is used to allow your private network to hide behind and be represented by something else. NAT routes traffic from the container to your system, which essentially makes the system the gateway for the container. The masquerade allows us to translate multiple IP addresses into anothe single IP address. Again, without going to far off the path, BusyBox IS busy and sets up eth0 automatically for us.

    Back onto our path – because we forgot about the nginx – which by default is a website and it will use port 80. SOoooo can my home computer reach that website?? Back on your host computer pull up your favourite browser and input the ip address assigned to enp0s3 back at the beginning, put it into the url bar of your browser. There should be no joy here.

    This needs to be fixed manually – that being you have to expose the port manually. And then after that we’re going to have to redeploy the nginx machine. To do that let’s stop the nginx machine with the following command:

    sudo docker stop name z

    Redeploy our nginx machine but with another instruction in the command line to expose port 80 Input as follows:

    sudo docker run -itd --rm -p 80:80 --name z nginx

    And then a quick check to see what changed: Input the following command:
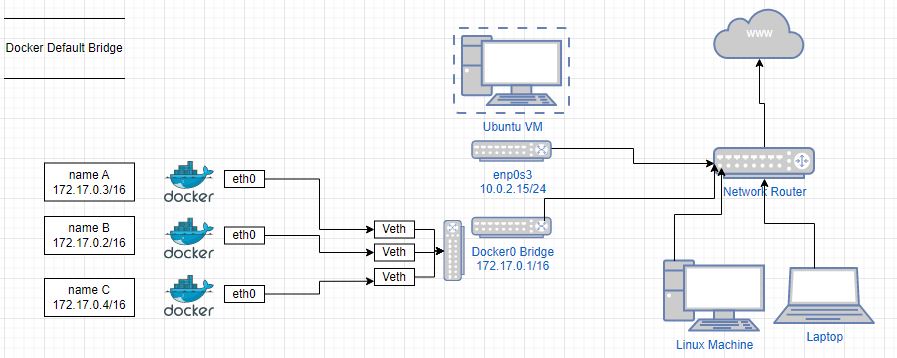
    sudo docker ps

    You’ll see the ports exposure now and you can refresh your page in your host computers url and you should see the message “Welcome to nginx” telling us nginx webserver has been successfully installed and working. Awesome. Below is a simple diagram of the Default bridge network created in Docker.

    Docker Default Bridge Network

    Network 2 – User Defined Network

    This is all okay though – what we want to have here is some isolation between your containers and your network.
    And isolation from the host too. Which is great for our lab!

    So on to the next network type – user defined: We’re going to set up our own network instead of the
    default network.To do this we are doing to create a ‘user-defined’ bridge.

    Which is as simple as the following command:
    Before doing this – you just need to think of a name for your network.

    sudo docker network create 'nameofyourchoosing'

    Do a quick check:

    ip address show

    Another command:

    network ls

    Which reveals the Name chosen and network type

    From here, because we’re no longer in default world – we get to take the bull by the horns and do something!
    Let’s add some containers to our new network with the following command:

    sudo docker run -itd --rm --network 'newnetworkname' --name 'ofyourchoice' busybox

    Add another busybox in there so noone is alone – hit the up arrow and change your name:

    sudo docker run -itd --rm --network 'newnetworkname' --name 'ofyourchoice' busybox

    Let’s have a look at our progress:

    ip address show

    And use the “bridge link” command to see those new interfaces tied into the new virtual bridge we created.

    Then we can inspect that bridge with the following command to view what IP address our new machines were assigned: (write these all down).

    sudo docker inspect newnetworkname 

    No doubt you might be wondering why we’re doing all this right. I’m personally just trying to
    learn and to show what I’ve been learning along my journey. But the real point of all THIS is
    ISOLATION.

    What is so great about all this is that we get ISOLATION. Anyone in IT, networking,
    cybersecurity, or sysadmins knows how important isolation is. What is great about

    Let’s just demonstrate this real quick: Drop back into one of the default network machines and ping
    one of our user-defined network machines by entering into the shell with the following command:

    sudo docker exec -it namex sh

    And ping our machine accross the hall in the other network and you should be getting 100% packet loss.
    Bridges are the best network in Docker, especially if you’re going to be using Docker in production.

    Another benefit of creating user defined networks is that you can ping using names instead of IP addresses.
    The reason this is helpful, especially in a bigger network, as you deploy new workloads, the nature of DNS
    is going to mean the IP addresses might change – but your user defined names won’t – so they’re easier
    to find and manage.

    To demonstrate this point, ‘exit’ out of your previous shell if it was in the default network, and
    drop into another shell in your user defined network with the following command:

    sudo docker exec it namea sh

    Then input

    ping nameb

    And here you’ll see the name, along with the IP address being identified. Cool.

  • System Administration

    System Administration

    Ubuntu Login Failure – Yikes!

    Encountered a pretty scary problem logging into my Ubuntu machine this morning. While updating the software, everything froze at 28%. I let it sit for a while to see whether it would resolve or not….it didn’t. After several attempts to perform an elegant shutdown, I reverted to an ‘inelegant’ shutdown. When I logged back in, the screen was all gray and displayed the few .txt files on my desktop. I could see the terminal, and click on it, but nothing would open. While I couldn’t actually view other applications directly, if I hovered over where I thought they might be, I could click on it and watch something grind away without any further results. My thinking here was to access the terminal and continue with the updates, or at least remove the partial updates and start from scratch. Even the logon screen wasn’t ‘normal’ as it wasn’t displaying the avatar on the user screen as it normally would – the avatar was a blank grey circle instead. I was able to attempt a more elegant shutdown using ‘ctrl, alt, del’ a couple of times but with the same results.

    My thought process at this point was the partial update was causing boot failure of some sort and looking into the GRUB or UEFI application might resolve the issue. So after another restart, I hit the ESC key until the UEFI screen displayed (to great joy!). Then I selected Ubuntu (recovery mode) which allowed the system to revert back to whence it came. From there I happily saw the system displayed as I expected it to.

    Once in the terminal again, I typed in the following commands:

    sudo apt –fix-broken install

    sudo apt-get update && sudo apt get upgrade

    sudo apt autoremove

    And now I have my computer back! Whew….

    Problem solved!!

  • Hardening Linux Systems

    Hardening Linux Systems

    Cybersecurity focus on Linux

    This project was part of the Cybersecurity certification. The process involved verifying permissions on the /etc/shadow file and creating user accounts incorporating 16-character passwords (not a user favourite is it?) with numbers and symbols expiring every 90 days. Also appended the Admin user to ensure as the only user with general Sudo access. Then created a user group with access to a shared folder for collaboration. Finally ran the Lynis report to audit the system and define actionable items for system hardening.

    Permissions on /etc/shadow should allow only root read and write access.

        1. - Command to inspect permissions: 'ls -l /etc/shadow' displays read/write access, for owner only
    
      - Command to set permissions (if needed): 'sudo chmod 600 /etc/shadow' will change permissions to -rw- --- ---
    1. Permissions on /etc/gshadow should allow only root read and write access.
      • Command to inspect permissions: ‘ls -l /etc/gshadow’ displays read/write access, for owner only
      • Command to set permissions (if needed): ‘sudo chmod 700 /etc/gshadow’ will change permissions to -rwx — —
    2. Permissions on /etc/group should allow root read and write access, and allow everyone else read access only.
      • Command to inspect permissions:’ls -l /etc/group’ displays read/write access to root, and everyone else can read only:
        as displayed here: -rw- — r–
      • Command to set permissions (if needed): ‘sudo chmod 644 /etc/group’ will change the permissions, if required to -rw- r– r–
    3. Permissions on /etc/passwd should allow root read and write access, and allow everyone else read access only.
      • Command to inspect permissions: ‘ls -l /etc/passwd’ displays read/write capability for owner (root) -rw- — r–
      • Command to set permissions (if needed): ‘sudo chmod 644’ to change permissions, if required to -rw- r– r–

    Step 2: Create User Accounts

    1. Add user accounts for sam, joe, amy, sara, and admin.
      • Command to add each user account (include all five users): sudo adduser sam | sudo adduser joe | sudo adduser amy | sudo adduser sara | sudo adduser admin
      then run ‘sudo usermod -aG sudo admin’ to append admin to sudo user

    1. Force users to create 16-character passwords incorporating numbers and symbols. (Note this has system wide effect)
      • Command to edit pwquality.conf file: ‘sudo nano /etc/security/pwquality.conf’
      • Updates to configuration file: remove the # from minlen and change value to = 16
        remove the # from dcredit and change value to = 0
        remove the # from ucredit and change value to = 0
        remove the # from lcredit and change value to = 0
        remove the # from ocredit and change value to = 0
        remove the # from minclass and change value to = 1
    2. Force passwords to expire every 90 days.
      • Command to set each new user’s password to expire in 90 days (include all five users): ‘sudo chage _M 90 user’ lets expire their password effective today in order to force a change (-E 17/10/2020)
        let’s also set up the users so they get 5 days warning (-W 5) moving forward sudo chage -E 17/10/2020 -M 90 -W 5 admin
        sudo chage -E 17/10/2020 -M 90 -W 5 sam
        sudo chage -E 17/10/2020 -M 90 -W 5 joe
        sudo chage -E 17/10/2020 -M 90 -W 5 amy
        sudo chage -E 17/10/2020 -M 90 -W 5 sara
    3. Ensure that only the admin has general sudo access.
      • Command to add admin to the sudo group: after creating user ‘admin’ ran ‘sudo usermod -aG sudo admin’ to append admin to sudo user
        then to ensure admin has sudo access: run ‘groups admin’ (displays ‘admin : admin sudo’ which verifies ‘admin’ added to sudo group.)
        I then added a user under admin using ‘sudo adduser’ to prove admin’s sudo capability. It worked.

    Step 3: Create User Group and Collaborative Folder

    1. Add an engineers group to the system.
      • Command to add group: ‘sudo addgroup engineers’ (to verify group was added run ‘cat /etc/group | grep engineers’ Output ‘engineers:x:1018’
    2. Add users sam, joe, amy, and sara to the managed group.
      • Command to add users to engineers group (include all four users): ‘sudo usermod -aG engineers amy’ ; ‘sudo usermod -aG engineers joe’ ;
        ‘sudo usermod -aG engineers sam’ ;’sudo usermod -aG engineers sara’.
        run ‘cat /etc/group | grep engineers’ to view engineers group and determine amy, joe, sam and sara are indeed associated with the engineers group.
    3. Create a shared folder for this group at /home/engineers.
      • Command to create the shared folder: as root: ‘mkdir /home/engineers’
    4. Change ownership on the new engineers’ shared folder to the engineers group.
      • Command to change ownership of engineer’s shared folder to engineer group: run ‘sudo chown 1018 engineers’
        then ran ls -l to view directories – and engineers shows 1018 with root

    Step 4: Lynis Auditing

    1. Command to install Lynis: ‘sudo apt-get install lynis’
    2. Command to see documentation and instructions: ‘sudo man lynis’ to display man pages
      ‘sudo lynis show help’ to display commands and options
    3. Command to run an audit: run cmd ‘sudo lynis audit system’
    4. Provide a report from the Lynis output on what can be done to harden the system.
      • Screenshot of report output: .jpg 1 & 2 in folder
    Lynis Audit Report

    Bonus

    1. Command to install chkrootkit: ‘sudo apt install chkrootkit -y’
    2. Command to see documentation and instructions: chkrootkit -h
      This changed! Check documentation on how to run a scan to find system root kits.
    3. Command to run expert mode: expert mode is option -x sudo chkrootkit -x
    4. Provide a report from the chrootkit output on what can be done to harden the system.
      • Screenshot of end of sample output: .jpg included in file
  • Why choose Cybersecurity??

    Why choose Cybersecurity??

    Do you wonder what goes on when you are sleeping? (Or working. Or editing. Or watching attempts ‘live’ on screen as you write about it.) This website, at the time of writing, was literally a few days old. Fortunately, I have taken some precautions and used complex passwords. I can’t help but feel a sense of violation. There are people out there RIGHT NOW trying to log on to this website and wreak havoc with whatever it is that they want to do. I am frankly surprised, that at such a point in this websites’ existence, people see it worth their time to break the law and attempt access. The threat actors are from Russia, others from India. Disappointingly there are some from Sweden and the USA. One was from the UK. There are so many things going on in this world, why someone would actually spend time trying to hack into the website of some guy from Canada trying to forge a new path? Crazy.

    Here is the sad truth: in the last 60 minutes alone, there have been 9 attempts to hack my site. Overnight, every single hour that went by, there were more attempts from around the world. Mostly Russia, India, and Vietnam, but also Italy, Sweden, the USA, Bangladesh, and the Philippines. All I can hope for is that those black hats will experience the saying “what goes around, comes around”.

    So, if you think you don’t want to change your admin access password – you would be very wrong indeed. I sincerely hope this post convinces you to change your default password, preferably to a complext password to thwart their efforts.

    Cybersecurity addendum: While I was updating THIS project, someone called my dad, saying he was my son and had gotten in trouble with the police and that he needed $6,000 for bail. This threat actor claimed he was really upset and cried to justify not sounding like my son when challenged. What is scary is this threat actor knew my son’s name as well as both my parents’ names. I do know that dad had his phone stolen in Moscow several years ago (imagine that) and no doubt all that contact information is out there for sale on the (dark) web, but the audacity and aggressiveness of these criminals concerns me.

    It really is a shame that criminal elements don’t put their resources to more productive use and try to make this world somewhere better to live, not just for themselves, but for other people.

    And so it is that I have taken up cybersecurity as self defense.

  • QA Testing – Contact Form

    QA Testing – Contact Form

    Just a quick test to verify the new Contact Form works as expected. Trust and verify. Assumptions can be disappointing at least and dangerous at worst.

    Contact Form content makes it through! Test complete.
  • Thunderbird Install

    Thunderbird Install

    If your email provider only allows POP3, transferring your existing emails for storage is
    work compared to IMAP or a simple IP address on their server. My project involves POP3 as
    the only option, so let’s delve in!

    Oh yeah, Thunderbird. I didn’t know what this was until this project, so I want to offer
    a brief explanation. Thunderbird is an Open Source email client. What does THAT mean right?

    To start off, GMAIL, Hotmail, Yahoo, Outlook and the like are all what are called
    ’email providers’ who off you an account, an address, a server and a webpage to view and
    send emails.

    Most ISP’s offer email as part of the ISP service, slightly different than email providers
    who provide email for ‘free’ so long as you put up with advertising. The ISP model is paid
    for by the user, therefore the advertising is reduced. But these are still just email providers.

    An ’email client’ on the other hand are capable of communicating with one or more
    email servers and retrieve those messages. So for example, say I had a Gmail, Yahoo, Outlook
    and Hotmail email. I would (without an email client like Thunderbird) have to go onto 4 different
    sites to view four separate accounts. With an email client like Thunderbird though, I am
    able to view ALL four account emails in one application on my computer or phone. It’s a
    consolidator in essence. Thunderbird is created my Mozilla, is Open-Source, has no adverts
    and once you figure it out, it’s magnificent! You can copy from one message in one email account
    and paste it into another email in another email account. You can drag and drop messages
    between accounts and manage/file your email correspondence centrally. Enough of that now.

    Let’s install: But before we do that, Thunderbird comes in MAC OS, Windows and Linux flavours.
    SO go to www.thunderbird.net/en-US/Download/ and download the version applicable to your
    computer OS. It’s FREE. I usually just put these things in my Download folder. You are downloading
    an executable so you should have to allow something to alter your computer. Click YES

    For adding another account, select File, New, Existing Mail Account.

    If you don’t see File in the Menu bar (assuming Windows 10) then select the ALT key and you will see the Menu Bar displayed in the top left.

  • Re-purposed old laptop

    Re-purposed old laptop

    Took an old Dell Inspiron 9400 that was built for Windows XP and re-imaged it with the Linux Ubuntu distro. Given that XP hasn’t been supported since April 8th of 2014, the laptop (a 3.49kg gorilla with a now retro chassis) was essentially unusable without some changes. The result was an excellent learning opportunity: figuring out the BIOS, how to configure the thumb drive, activate and load the file, and then using the new OS. It was one of my first projects. And a LOT of fun.

    In retrospect, Ubuntu is not a lightweight product – and is still too much for the 9400, which is slow and clunky – but secure for now. It has been fun to date and I am going to update to a much lighter Linux distro when the website project is where I want it to be in terms of showcasing my IT abilities.

    Insight to my thought process: The 9400 has a 1.6 GHz Processor, 2 GB RAM, and 100 GB Storage capacity running an Intel Core Duo Processor T2300. I’m guessing this is a 32-bit architecture – TBD. So I’d be looking to install something Ubuntu based (I’m used to it) and light enough that it will be usable. I quite like the chassis on this machine and it’s awesome using something in my home lab that otherwise would have found its’ way into a landfill somewhere.